Big industrial lifts aren’t just about tons and boom length, they're about thorough planning. Our lifts in California and Arizona require the right crane, right control, and the know-how to make every hour on site count. Hill Crane Service has supported complex industrial operations across both states with detailed lift plans, engineered rigging, and practical field execution. Use this field-tested guide to scope the lift, select gear, and avoid re-work.
1) Define the Lift: Load, Geometry, and Site Realities
Start with numbers and constraints before you pick a crane.
- Load calculations: Weight, CG location, dimensions, pick points, lift restrictions (Blue/Red tags), and any off-axis or tilt-up movements.
- Reach & height: Horizontal reach, hook height, tip radius, offset clearances, tail-swing zones.
- Ground & subgrade: Bearing capacity (soil type), underground utilities, offsets, approach grades, turning radius.
- Overhead & dedicated zones: Overhead power lines (specify in feet), beam clearances, right-of-way lane closures, or other traffic-related restrictions.
- Interface: Who provides ground bearings, lift plans, riggers, and spotters? Clarify early.
Pro-Tip: Treat tower cranes and radius as your baseline figure lift radius first. If you can’t clear obstructions, you may need a different class of crane.
2) Choose the Right Crane Class (and Why)
Telescopic mobiles and tower cranes both excel for industrial projects but demand different site conditions when selecting:
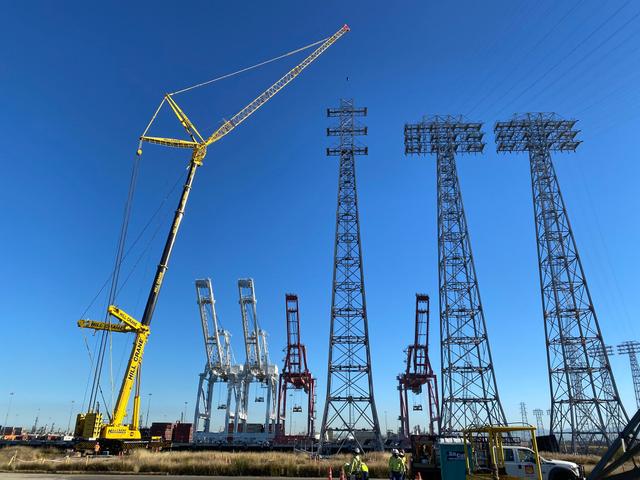
- All-Terrain (AT) Telescopic: Road-legal across CA & AZ, great reach combined with off-road/tight spaces. Ideal for Long Beach and projects needing variable load and ground conditions.
- Rough-Terrain (RT) Telescopic: Short-travel, big tires, strong picks on mid-radius perfect for plants, yards, and sites with unfinished ground.
- Lattice Crawler: Higher capacity and better charts for long picks. Consider cranes whose outriggers or crawler tracks can spread the load where subgrade is weak.
Key Clarification: It’s not just the crane pads that drive the choice. If your site can’t handle outrigger reactions safely, you may need a smaller unit or alternative setup. This is often more critical than the size of the crane pads themselves.
3) Rigging That Protects the Load and Your Schedule
Precision rigging shortens set-ups and prevents damage:
- Spreader bars/frames: Keeps slings efficient, protects fragile loads, improves CG control.
- Sling choice:
- Round-slings (synthetic) good for coatings/composites; check temp limits first.
- Wire rope: abrasion-resistant, conforms to fixtures.
- Chain: good for high-temperature but heavier mind lift radius and tag lines.
- Retainers/tummy-grips: For ISO containers, skids, vessels, and awkward or eccentric loads.
- Selectors & de-rates: Mandatory round-sling de-rates to preserve sling capacity.
- Documentation: Mill certs, sling logs, and rigging hardware to be load-(R) tested with current inspections.
Pro-Tip: Keep sling angles ≥60° whenever possible. Below that, tension skyrockets and so does risk.
4) Heavy Haul, SPMT & Modular Transport When the Road Is the Risk
Moving the load can be harder than lifting it. Plan modular transport and lift planning from day one:
- Route surveys: Bridge ratings, clearance restrictions, turn templates, utilities, police escorts.
- SPMT (Self-Propelled Modular Transporters): Ideal for power plants, refineries, and large industrial yards. Note: at universities or campuses these are usually deployed on private service roads or plazas rather than public streets.
- Staging & methods: Design the handoff between crane to crane or crane to gantry so lifts align with travel.
- Load spread: Mats, grillage, steel plates, and shims to grade or prep ground before mobilizing.
5) Traffic Control & Public Interface (Street and Port Work)
In California and Arizona, tight lane closures and public-facing pick zones are common but they exist for a reason. Always state why:
- Lane closures: Needed to safely extend crane outriggers or to swing loads over traffic lanes.
- Port traffic control windows: Required to coordinate with harbor operations and security.
- Crosswalk or sidewalk restrictions: Protects pedestrians when loads pass overhead.
- Flaggers & spotters: Control both vehicle and pedestrian interfaces during picks.
- Signage & lighting: Use light towers, reflective PPE, and radio discipline.
By explaining the reason for each closure (safety, outrigger setup, or crane swing clearance), you help the public and stakeholders understand the disruption.
6) Engineering & Lift Planning That Actually Saves Time
Hill Crane’s lift planning engineers reduce risk from the crane out to the road edge:
- 3D lift models: Verify radius, boom config, rigging geometry, soil rating, and lift interferences.
- Simulated hoist paths: Predict rigging/boom clearances before set-up.
- Weather windows: Use wind-specific models by local area and time of day, not just generic 20-25 mph ratings.
- Contingencies: Secondary rigging kits on site, alternate picks if lane or section blocks delay the first lift.
- Pre-Job Unit (PJU): Hold signal/spotter briefings, assign triggers, and mark emergency actions.
7) CA & AZ Realities You Should Plan Around
- Hot weather at Long Beach: Crews around containers need shade, hydration, and impact-rated gloves.
- Heat (AZ): Plan human breaks before machines shade, hydration, and heat-resistant gloves for riggers.
- Safe haul & lifts: Add extra cooling, double-check crane support when surfaces are soft or uneven.
- Environmental constraints: Noise ordinances, light spill at night, community feedback controls.
8) Safety Is a System, Not a Slogan
- Qualified Engineers & Riggers: All permit conditions and site-specific credentials checked.
- Exclusion zones: Tag-lines for high-ball loads, long-reach picks, or material personnel at the tail patch.
- No pick without spotter: All lifts observed and guided within line of sight of rigging crew.
- Toolbox checks: Pause after the first pick to adjust radius or mode if anything changes in site conditions.
- Speed controls: Establish crane/rigging zones based on travel speed for lifts.
Typical Hill Crane Use-Cases (with Clarifications)
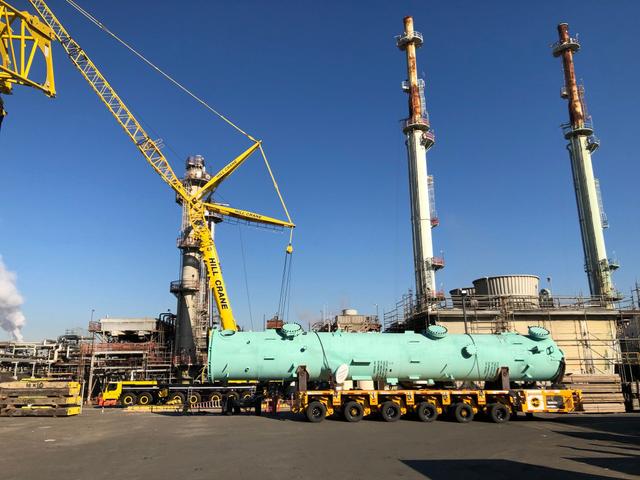
- Long Beach, CA refinery wharves: 52-zone with engineered spreads, tight lane closures (needed for outrigger set-up), port traffic windows (scheduled to match ship traffic).
- Aerospace module set SoCal campus: Landside yard within confined area; load isolated, light architectural clearances.
- Airports and SPMT offloads: Use FAA clearance for final placement; load kept separate with minimum public interface.
- Utility substation: Isolated transfer for long industrial transformers on port entry pads with mats and back-out options.
This makes clear why closures exist and which operations are strictly inside private zones.
Your Fast Pre-Bid Checklist
- Certified load weight & CG drawing.
- Mat location, hook height, and obstructions.
- Ground bearing & underground utilities (think mat size not just stone).
- Rigging lift plan (spreader, slings) and inspection status.
- Permit/easements, site access, slopes, escorts.
- Weather thresholds, alternate sites, and contingency plan.
Send checklists to Hill Crane at pre-award to tighten crane selection, engineered rigging packages, heavy haul/SPMT plant move, and traffic-control layout that satisfies the AHJ and your schedule.
The Takeaway
Successful lifts start with verified data, clear communication, and experienced crews. Hill Crane Service supplies seasoned operators and planners who coordinate closely with your team to minimize risk and downtime. Every lift plan is backed by field experience, engineered rigging, and pre-bid planning so your project stays on schedule and in compliance without overstating or promising what can’t be verified.